


Roger's Gardens
Water-Wise Project
Fifteen years ago, Roger’s Gardens was surrounded by lush lawns, lots of them. Times change and so do landscapes. In August of 2015 we took on the ambitious project of removing the last remnant of our lawns. Completing the last leg of a project that we began over ten years ago, we uprooted the water-thirsty grass on our corner landscape and replaced it with a much more climate appropriate and water efficient blend of California Friendly Mediterranean plants.
We thought you might be interested in how we did it. Perhaps it will inspire you to do something similar. If so, we are here to help.


Step 1: Create a Plan
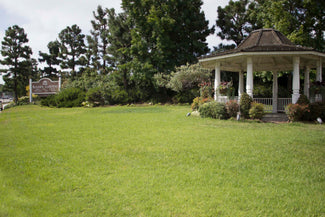
June 2015. About 4-5 hours
This was the starting point. 6,000 square feet of thirsty mixed lawn, including hybrid bermudagrass, fescue and kikuyugrass.
We knew we wanted to replace our corner lawn for a few years. The Nursery Manager, Landscape Manager and others sat down in July and developed a final plan for how we wished to re-purpose this space. It is about 6,000 square feet with a background of established trees and shrubs. We measured and plotted the area digitally using Computer Aided Design (CAD) software. By using this software, we were able to re-design, move plants, change contours and make any other adjustments easily. After lots of back-and-forth conversations we settled on a final design. Once the plan was made a complete itemized plant and materials list was created and everything was ordered.
We also applied for a turf rebate, being offered by OC WaterSmart.com. Our site was inspected, and we received pre-approval for the project and to begin the work.

Step 2: Kill the lawn
July 30, 2015. About 2 hours.
Effectively and completely killing a warm-season lawn follows a very specific procedure.
Killing a lawn is intimidating for many people. If not done correctly, it can return with a vengeance and re-infest any new plantings. Timing and technique are critical. Since a good portion of our lawn was occupied by warm season grasses, we knew we needed to perform the removal during summer. Here’s how we did it and how we recommend most homeowners go about it.
From mid-summer through the end of October is the best lawn killing season in Southern California. It can be nearly impossible to kill most grasses in winter. Surprisingly, the most important step in killing your lawn is to get it healthy first. This contradicts many people’s common sense, but a sickly, under-fertilized, underwatered and unhappy lawn may turn brown, but it won’t be killed. So, if it is browning and stressed now, start watering it and feed it too. You have to get your lawn healthy before you kill it.
We are organic gardeners at Roger’s Gardens, selling only organic and natural fertilizers, pest controls and so on, but for killing warm-season lawns nothing other than a systemic herbicide will do a total kill.
When the time comes to spray the lawn, be sure you are using the right sprayer. A high-quality hose-end sprayer is fine, so long as it mixes accurately and is designed for herbicides, not fertilizers.
We picked a warm day, but not blazing, with no breeze. Air temperatures in the mid 70’s to low 80’s is ideal. We mixed the herbicide exactly as directed. Don’t try to make a “super batch” by adding more herbicide than the directions say, this will backfire every time. We sprayed each blade thoroughly, applying the spray from opposing directions, taking care not to damage any nearby plants.
Then, we turned off the irrigation system completely and just waited. As expected, the lawn looked the same for the first few days, but within two weeks it was straw brown and dead – completely dead, root and all.
For more detailed information about how to properly remove your lawn, see this excellent article by Roger’s Gardens.

Step 3: Remove the dead turf
August 11 & 12. About 80 hours.
We used a sod-cutting machine to remove the old turf, along with about an inch of soil and root.
Depending on your situation and your outlook, this step could have some variation, or even skipped in some applications. In our case, we decided to cut and remove the old, dead sod, but in many situations this step can be skipped or modified, and a great deal of expense and effort eliminated.
To remove the old sod, we used a sod-cutter, a gas-powered machine that slowly moves across the old turf and cuts a section twelve inches wide and with about an inch of soil and old root mass. Sod-cutters can be rented at many equipment rental stores. Before we began, we marked the sprinklers with small landscape flags, so as not to damage them. It took us about a day to cut and remove the entire 6,000 feet. Once cut, the dead sod needed to be scooped up, loaded into a special bin and hauled to a green waste facility.
Sod cutting and removing of the old turf is a laborious process, so don’t take it lightly. Also, sod and soil cannot be disposed of in normal trash or green-waste collection bins. It is bulky and heavy. To accommodate our 6,000 feet, we filled four full size “low-boy” containers. Each of these is about $500, so plan accordingly.
The alternative to sod-cutting is to simply mow, or “scalp”, the dead grass down as close to the soil as possible. This will generate a lot of waste, but will not include soil, so it can be disposed of more traditionally and less expensively. A scalping approach is satisfactory if you are not changing the soil grade and are not planning to add any soil amendments or conditioners to the soil. Many Mediterranean plants, California Native plants and other tough, water-wise plants are perfectly suited to being planted without soil amendments or into cultivated soil, so give it some thought.

Step 4: Rough Grade and Layout
August 13, 2015. About 4 hours.
Our Landscape General Manager and lead designer Tim Fiskin marks some borders for a future pathway and a raised soil area.
We changed the grade of the soil in several areas, creating mounds and gentle contours to give the area more interest. As we prepared the area for rain and the correct drainage, we discovered a few low areas, so we needed to move a little soil around. At this stage we also roughly marked off our future pathway and the raised soil areas so that we could prepare four our next step, topsoil delivery. This is also a good time to do a few irrigation adjustments and repairs.


Step 5: Soil and Amendment Delivery and Final Grading
August 13 & 14, 2015. About 40 hours.
To build up the raised areas we added 50 cubic yards of soil to our landscape. The soil that is chosen for this is an important decision, and the least expensive is not necessarily the best choice. When bringing topsoil into a landscape it needs to be free from weed seeds and of the correct texture. We used a blend called “50-50” and purchased it from a reliable supplier with a good reputation. “50-50” is a standard, high quality mix containing clean, screened topsoil that is blended with an organic amendment. Four truckloads were delivered, one-by-one over the course of two days, and strategically dumped right where we needed them.
We also used 160 bags of our own soil organic amendment, but only in an area of about 700 square feet where we planned to install a meadow grass-like plant called Carex pansa or meadow sedge. The remaining majority of the landscape was not amended. Carex pansa or meadow sedge is a native plant that resembles a long wavy meadow grass but prefers slightly richer and more moisture retentive soil than the balance of our new landscape. For all of the other 5,000 square feet of landscape we needed no soil amendments at all.

An Extra Step: Give the Gazebo a Facelift
August 19, 20, 21 and 22, 2015. About 56 hours.
First the gazebo was surrounded by a screen barrier
With our installation of our new low-water landscape, we decided to give our classic gazebo a new look as well.
We erected a ten-foot-high screen around the gazebo, added scaffolding, and then spent the next two days removing all the white paint from the structure. The paint removal was done use by sandblasting, followed up with a lot of hand sanding and tedious detail work. We did not use any solvents or chemicals. We also made a few repairs to the structure.
Once all the white paint was removed the entire gazebo was brushed by hand with a heavy-duty wood sealant that will preserve the gazebo’s natural beauty and wood grain.


Step 6: Install Walkways
August 21, 2015. About 32 hours.
A 30” wide path was added, framed by a 2-inch thick composite edging.
Once the soil was graded and the final contours were established, we were ready to install the meandering pathway. The path allows visitors to move through the garden to see the plants and detail close up, as well as allowing our maintenance staff to enter the area.
The path was laid out first by marking the soil with bright landscape paint. The borders of the pathway were made of a two-inch wood composite material, with stakes about every eight or ten feet. Less expensive, thinner edging is more commonly used, but in our experience this heavier edging makes a much more elegant curve and holds up to maintenance and foot traffic.
The edges of the path were set 30 inches apart. We then removed the soil between the edges to a depth of three inches. Five cubic yards of decomposed granite was added to a depth of two inches over the entire length of the path.
The decomposed granite was smoothed with rakes and then compacted with a powered machine called a tamper. This is another item that most equipment rental yards will have. The tamper compacts the material and creates a beautiful walking pathway.

Step 7: Plant Deliveries
August 13, 2015. About 4 hours.
Plants were hauled from their storage area to the corner.
During the week preceding installation, 3,477 plants were delivered to Roger’s Gardens from sources all over California. As most of you know, Roger’s Gardens likes to use interesting and innovative plants, not necessarily those that one sees throughout Southern California. Finding and assembling a list of innovative and interesting plants can be challenging, but it is our specialty. At the end, we got what we wanted; over 30 different species and no “everyday” plants.
Once we were ready to plant, we carted all 3,500 plants out to the new landscape and lined them up in one corner.

Step 8: Spotting the Plants
August 24 & 25, 2015. About 24 hours.
When spotting plants, sometimes the design and the reality require a few on-the-fly adjustments.
One of the most rewarding parts of designing a new landscape is “spotting” the plants. While still potted, our designer and nursery manager placed and re-placed every plant, often two or three times, until they were satisfied. This is the point in every new landscape where the paper design and the physical landscape intersect. Colors, forms and textures could now be seen in real life. Plants were moved, re-located and edited, then we stood back and evaluated our combinations. A few more moves, another evaluation, more moves and so on and so on until we were satisfied.
Eventually, all 3,500 plants were in their place, covering the entire 6,000 square foot area. We could now “see” the new landscape.

Step 9: Planting
August 24, 25, 28, 29 & 30, 2015. About 140 hours.
With every plant in its place we were now ready to begin planting. Thus far, no plant was actually in the ground. Now, one-by-one, every plant was planted into the landscape. Larger plants generally were installed first, then the smaller plants, moving from rear to front. The Carex meadow and colorful Arctotis plants went in last. Five days of planting.


Step 10: Irrigation Adjustments
August 30, 2015. About 8 hours.
The soaker line was later covered by the surface mulch.
As plants went into the ground, some irrigation needed to be adjusted. The first step was to repair any breaks in the system. When machinery and shovels are involved there are always a few catastrophes. Next up was adjusting risers and pop-up sprinkler heads that needed to be repositioned or raised. We then flushed the system and adjusted the radius and arc of each head.
In order to eliminate any overspray and runoff, our parkways are irrigated using surface irrigation (soaker/drip systems). These lines were added and secured in place. All of the spray heads throughout Roger’s Gardens are high efficiency MP Rotators. These are state-of-the-art heads and deliver water at a much slower rate than traditional heads, which often create puddling and runoff within just a few minutes of use. Additionally, all of our systems at Roger’s Gardens are controlled with super-efficient climate sensitive controllers, often called SMART controllers. We receive local weather data daily and automatically adjust their schedules according to actual water needs.

Step 11: Surface Mulching
September 1 & 2, 2015. About 300 hours.
Seven pallets or 385 two-cubic foot bags of surface mulch were applied.
As anyone who has ever installed a new landscape will attest, weed prevention is critical; and our new landscape at Roger’s Gardens is no different. A thick mulch layer also reduces water needs by as much as 30%. Seven pallets (385 two cubic foot bags) of Shredded Cedar Bark were spread evenly over almost the entire area. Our objective was to leave virtually no soil exposed, since this is where weeds will invariably germinate.
We are big advocates of shredded mulches and don’t much like chipped or chunked products. Shredded mulches have the ability to intertwine, forming a mat that stays in place, rather than moving around with water, foot traffic and rain. The average depth of the shredded mulch was at least two inches. We will maintain it at that level with annual maintenance and some relatively small additions.

 BEFORE |
 AFTER |
 BEFORE |
 AFTER |
Roger's Gardens Property, Corner of MacArthur Blvd & San Joaquin Hills Rd
August 2015
Other Work
About 140 hours.
As with any landscape project there were other miscellaneous steps and expenses that were also an important part of the entire result. These included daily hand watering of all of the plants (60 hours), irrigation repairs and upgrades (24 hours) and daily trash and cleanup (56 hours). Rental equipment is another cost to be considered. Landscape lighting has yet to be installed.
Thank You!
We are deeply thankful to several companies for their continuing support and especially for their pioneering efforts in sustainable, climate-appropriate gardening. In particular, Roger’s Gardens thanks the great people at Monrovia Nursery, Native Son’s Wholesale Nursery and Kellogg Garden Supply for their support of this project.
Our Complete Plant List:
| • Agave attenuata ‘Raea’s Gold’ • Agave ‘Mr. Ripple’ • Agave ovatifolia ‘Green Form’ • Agave salmiana var. ferox ‘Medio Picta’ • Agave vilmoriniana ‘Stained Glass’ • Aloe ‘Always Red’ • Aloe dorothea • Aloe ‘Fairy Pink’ • Aloe maculata ‘Yellow Form’ • Aloe rooikappie • Arctostaphylos edmundsii ‘Carmel Sur’ • Arctotis ‘Pumpkin Pie’ • Carex pansa • Chondropetalum tectorum ‘El Campo’ • Cordyline ‘Electric Flash’ • Doryanthes palmeri |
• Grevillea lanigera ‘Coastal Gem’ • Grevillea rosmarinifolia ‘Scarlet Sprite’ • Hesperaloe ‘Brake Lights’ • Kalanchoe thyrsiflora ‘Desert Rose’ • Leucadendron ‘Cloudbank Ginny’ • Leucadendron Safari Goldstrike’ • Leucadendron ‘Safari Sunset’ • Lomandra longifolia ‘Breeze’ • Miscanthus sinensis ‘Morning Light’ • Miscanthus sinensis ‘Variegatus’ • Muhlenbergia capillaris ‘Regal Mist’ • Opuntia ‘Santa-Rita Tubac’ • Senecio decaryi • Sesleria autumnailis ‘Campo Verde’ • Yucca recurvifolia |
• Agave attenuata ‘Raea’s Gold’
• Agave ‘Mr. Ripple’
• Agave ovatifolia ‘Green Form’
• Agave salmiana var. ferox ‘Medio Picta’
• Agave vilmoriniana ‘Stained Glass’
• Aloe ‘Always Red’
• Aloe dorothea
• Aloe ‘Fairy Pink’
• Aloe maculata ‘Yellow Form’
• Aloe rooikappie
• Arctostaphylos edmundsii ‘Carmel Sur’
• Arctotis ‘Pumpkin Pie’
• Carex pansa
• Chondropetalum tectorum ‘El Campo’
• Cordyline ‘Electric Flash’
• Doryanthes palmeri
• Grevillea lanigera ‘Coastal Gem’
• Grevillea rosmarinifolia ‘Scarlet Sprite’
• Hesperaloe ‘Brake Lights’
• Kalanchoe thyrsiflora ‘Desert Rose’
• Leucadendron ‘Cloudbank Ginny’
• Leucadendron Safari Goldstrike’
• Leucadendron ‘Safari Sunset’
• Lomandra longifolia ‘Breeze’
• Miscanthus sinensis ‘Morning Light’
• Miscanthus sinensis ‘Variegatus’
• Muhlenbergia capillaris ‘Regal Mist’
• Opuntia ‘Santa-Rita Tubac’
• Senecio decaryi
• Sesleria autumnailis ‘Campo Verde’
• Yucca recurvifolia
SHARE
 |
 |
 |
 |